


.svg)
.svg)

Ghost + Airtable + Gmail: Send Automated email sequences to new Ghost members
Ghost.org doesn't allow running automated email sequences which is a huge drawback for everyone trying to use lead magnets with email followups to attract new subscribers. Here's a no-code workaround with the use of Airtable Automations and Gmail.
Contents
Join as a Free Member
to access this page
Case: Scheduled email sequence for new Ghost members
Offer a free email course as a lead magnet for new Ghost newsletter subscribers. Ghost lacks this functionality, but you don't want to use paid Zapier or Make and a paid Email Marketing Platform like Mailchimp to build the automation.
Method: Pass new Ghost member data to Airtable and send emails with Automations
- Use Ghost Custom Integration Webhook to send new member data to Airtable.
- Use Airtable Automation to save every member data to a table and count hours from their signup to schedule emails.
- Use conditional logic to check for a specific label in the subscriber's data and send an email via Gmail on schedule.
Step-by-step guide:
1. Cerate an Airtable base with two tables
Set up Course Emails table
Set up "Subscribers" table
2. Crete Airtable automation to obtain Webhook URL
3. Set up Ghost Integration
Create a Page with Signup Form
Create a Custom Ghost integration

4. Setup your Create Subscriber automation
Test the "When webhook received" trigger to get data schema and match fields
Set up a Create Record action
5. Build the scheduled Email sequence
Create Airtable automation for scheduling Email sequence
1st action: Match an email to send
2nd action: Send a previously found Course Email to the subscriber
Test the automation
6. Test the workflow
1. Cerate an Airtable base with two tables
This tables will host Course Emails and Subscribers data to match them via Automations later.
Set up Course Emails table
This table will host all our Emails for the course.

- Subject (Single line text field);
- Course Label (Single line text field);
- Content (Long text field, enable Rich Text formatting);
- Attachment (Attachment field);
- Hour # to send (Number field).
Set the Hour # to send field value to determine in how many hours every particular email should be sent since a member's signup.
Set up "Subscribers" table
This table will receive all our Ghost subscribes with Course Labels and other parameters.

- Email (Email field);
- Course Label (Single line text field);
- Signup time (default Created time field);
- Hours from signup (Formula field): DATETIME_DIFF(NOW(), {Signup time}, 'hours');
The "Hours from signup" formula will count hours from the moment a member recodr was created in the table till now and serve as a value to check and trigger our email automation.
2. Crete Airtable automation to obtain Webhook URL
This automation will be triggered when Ghost Custom Integration sends data to the webhook URL provided by Aritable.
- Add a "When webhook received" trigger
- You will copy the webhook URL and paste it to your Custom Ghost integration webhook settings at the next steps.
3. Set up Ghost Integration
Create a Page with Signup Form
- Type /signup on your page to insert the form.
- Assign a label (e.g., promo-course).
Manually assign the label to any member via Dashboard > Members > Edit Member to avoid bugs (otherwise Ghost won't assign it automatically on the form submission).

Create a Custom Ghost integration
This integration will send any new Ghost member data to Airtable via webhook URL.
- Add custom integration via Settings > Integrations.

- Name it as "New members to Airtable".

- Add a Webhook.
- Paste there a URL from your Airtable Automation trigger.
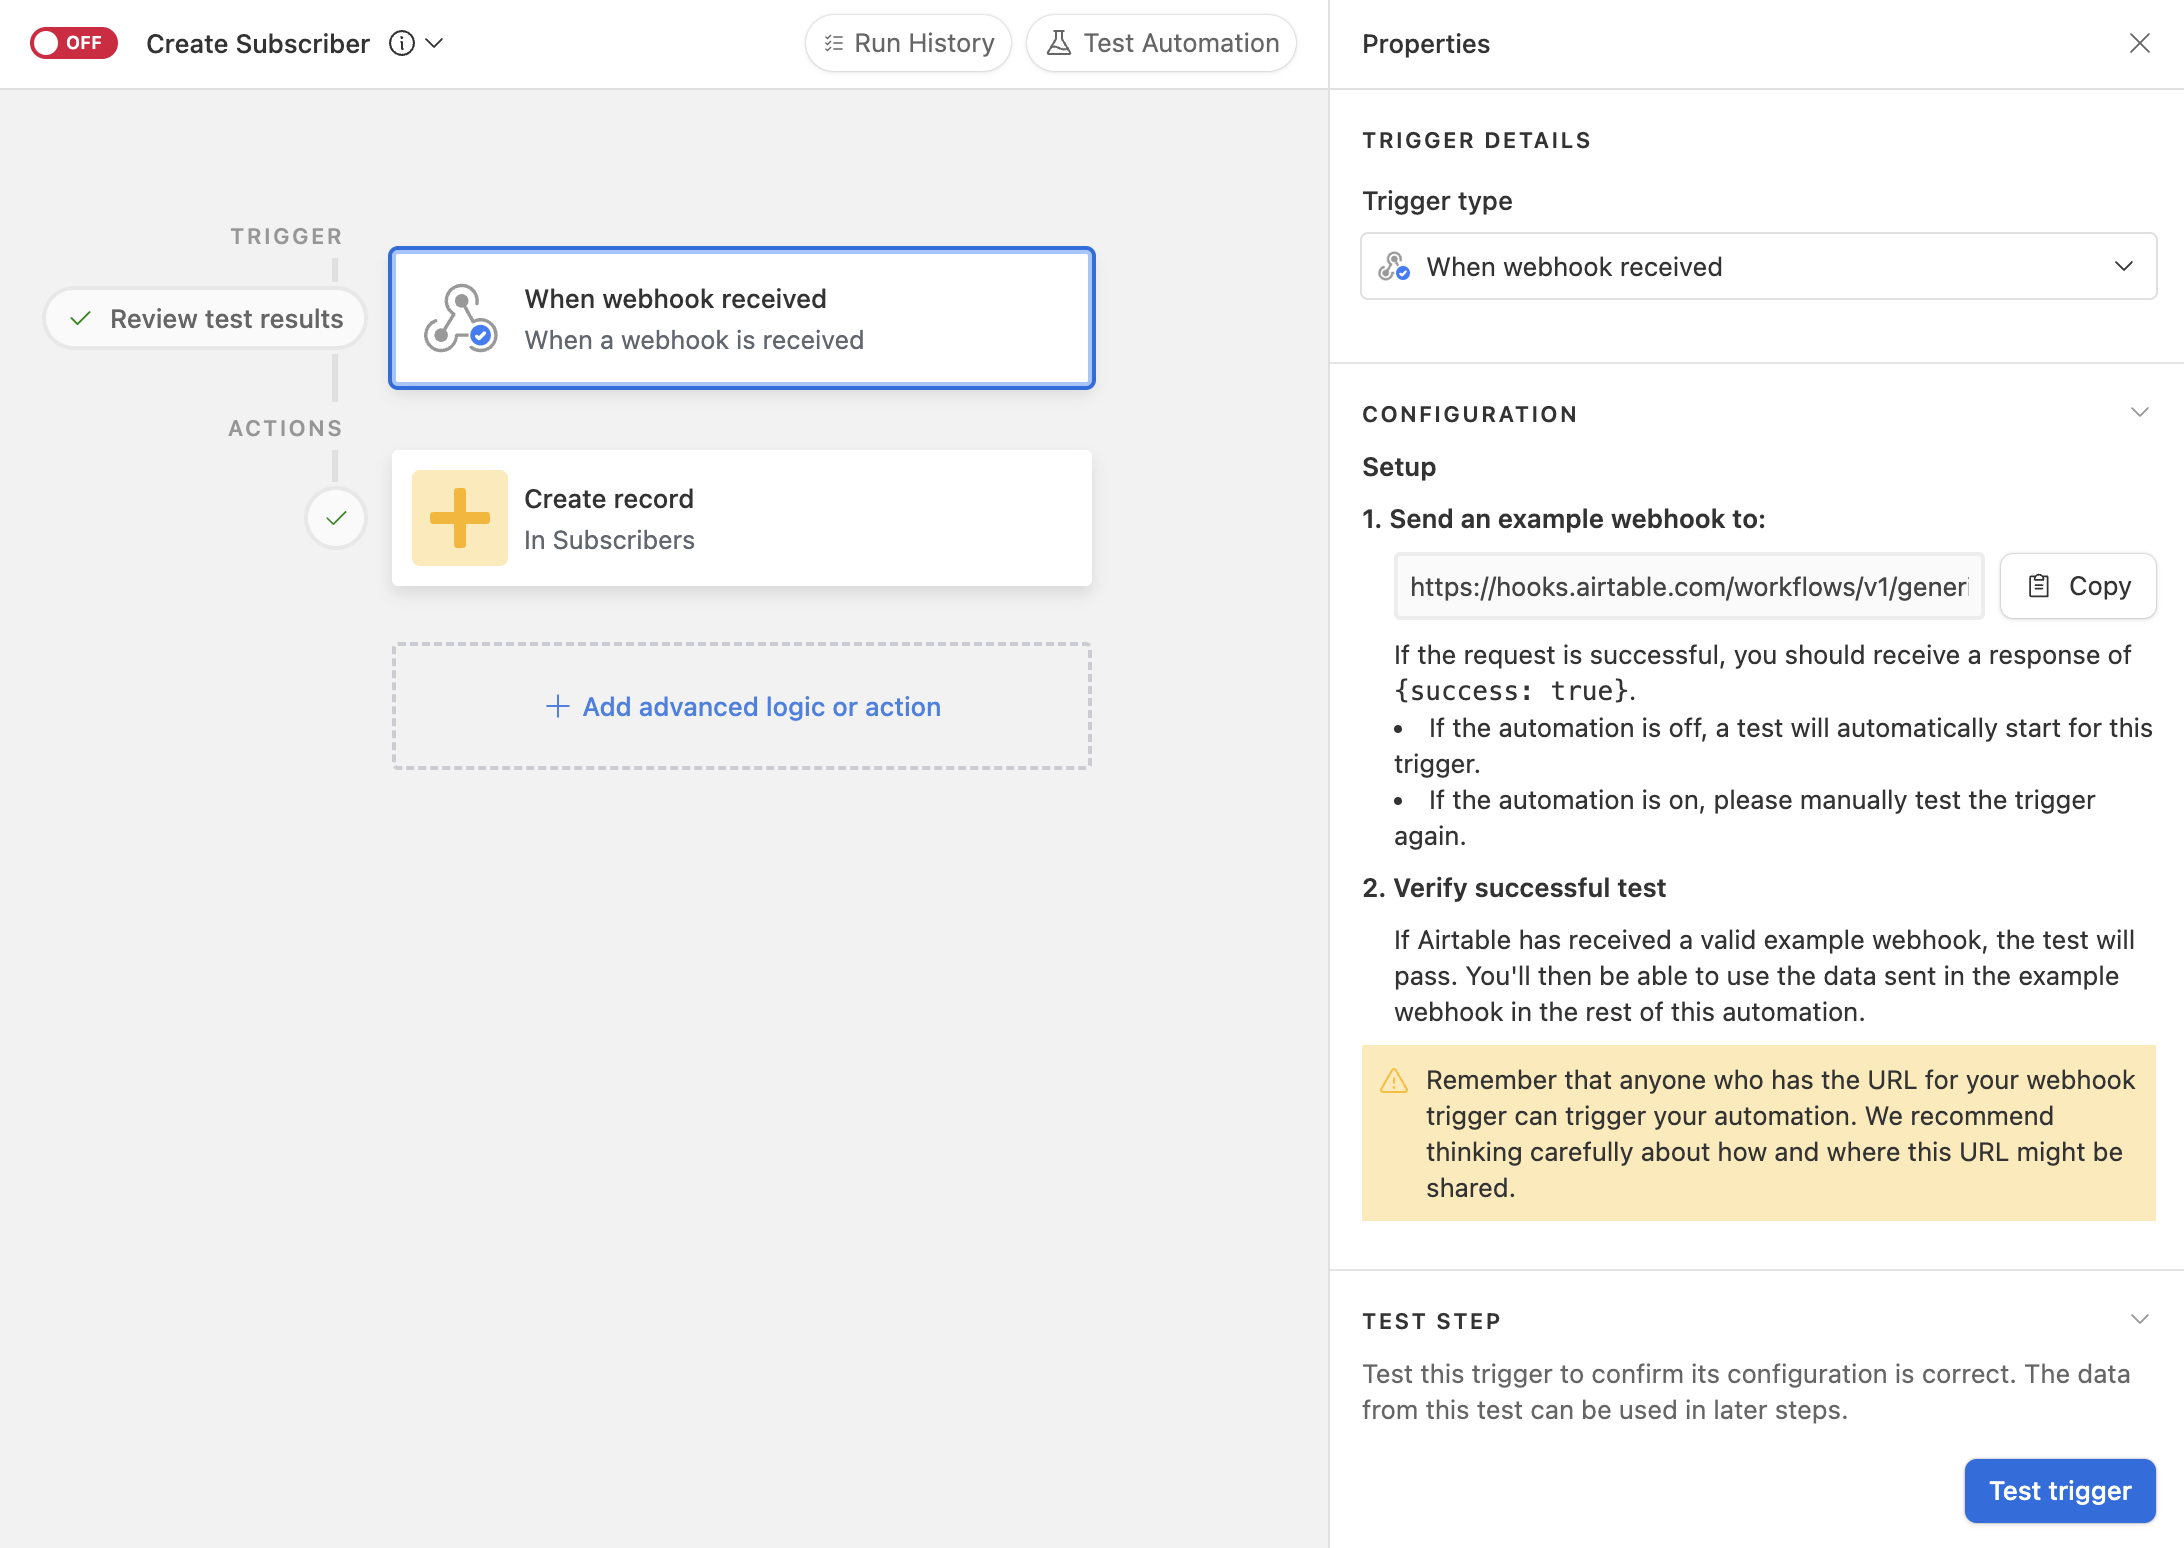
4. Setup your Create Subscriber automation
Test the "When webhook received" trigger to get data schema and match fields
- Go to your Ghost page with the form and submit it with your real email.
- Go to Airtable automation and click "Test trigger".
Make sure to confirm signup from an email you received from Ghost. Your custom Ghost integration webhook will not be triggered otherwise.
If the step is successful, you should see a correct email and promo-course value listed in labels.

Set up a Create Record action
- Add a "Create record" action.
- Link it to the "Subscribers" table.
- Connect Email and Course Label fields to data received from Ghost via webhook trigger.
- Use data from "When webhook received"
- Search for relevant values.

- Test your action. The record with a new member data should be created.

5. Build the scheduled Email sequence
This is a relatively complicated part with multiple conditions to consider and requires careful setup — you don't want to send out all your emails at once or get your email blocked by Google. That's why we suggest to start from a single Send Email action test before moving to building a scheduled sequence.
- We have one course with a promo-course label;
- 5 Emails in the course to be scheduled:
- 1st Email: Immediately on signup;
- Subsequent emails: Every 24 hours.
Create Airtable automation for scheduling Email sequence
As we have not one email to schedule, but 5, we will need a set of conditions to check which email to send based on how many days or hours went since a particular member signed up.
- Choose a Trigger: "When a record matches conditions"
- Set a series of "Or" conditions:
- When "Hours from signup" = "0"
- or "Hours from signup" = "24"
- or "Hours from signup" = "48"
- or "Hours from signup" = "72
- or "Hours from signup" = "96"
Called as "disjunction" in maths or simply "Or chain", this logic describes the situation with multiple conditions where if at least one is true, the overall expression is true. So, the trigger will monitor Every Subscriber in the table and the amount of full hours passed since signup to check if any of Subscribers in a table meets one of these 5 conditions.
Remember, the values of Hours from signup conditions are being set manually and not connected to what you have defined for each email in the Course Emails table. So if you'd like to change the schedule make sure to update this conditions accordingly.

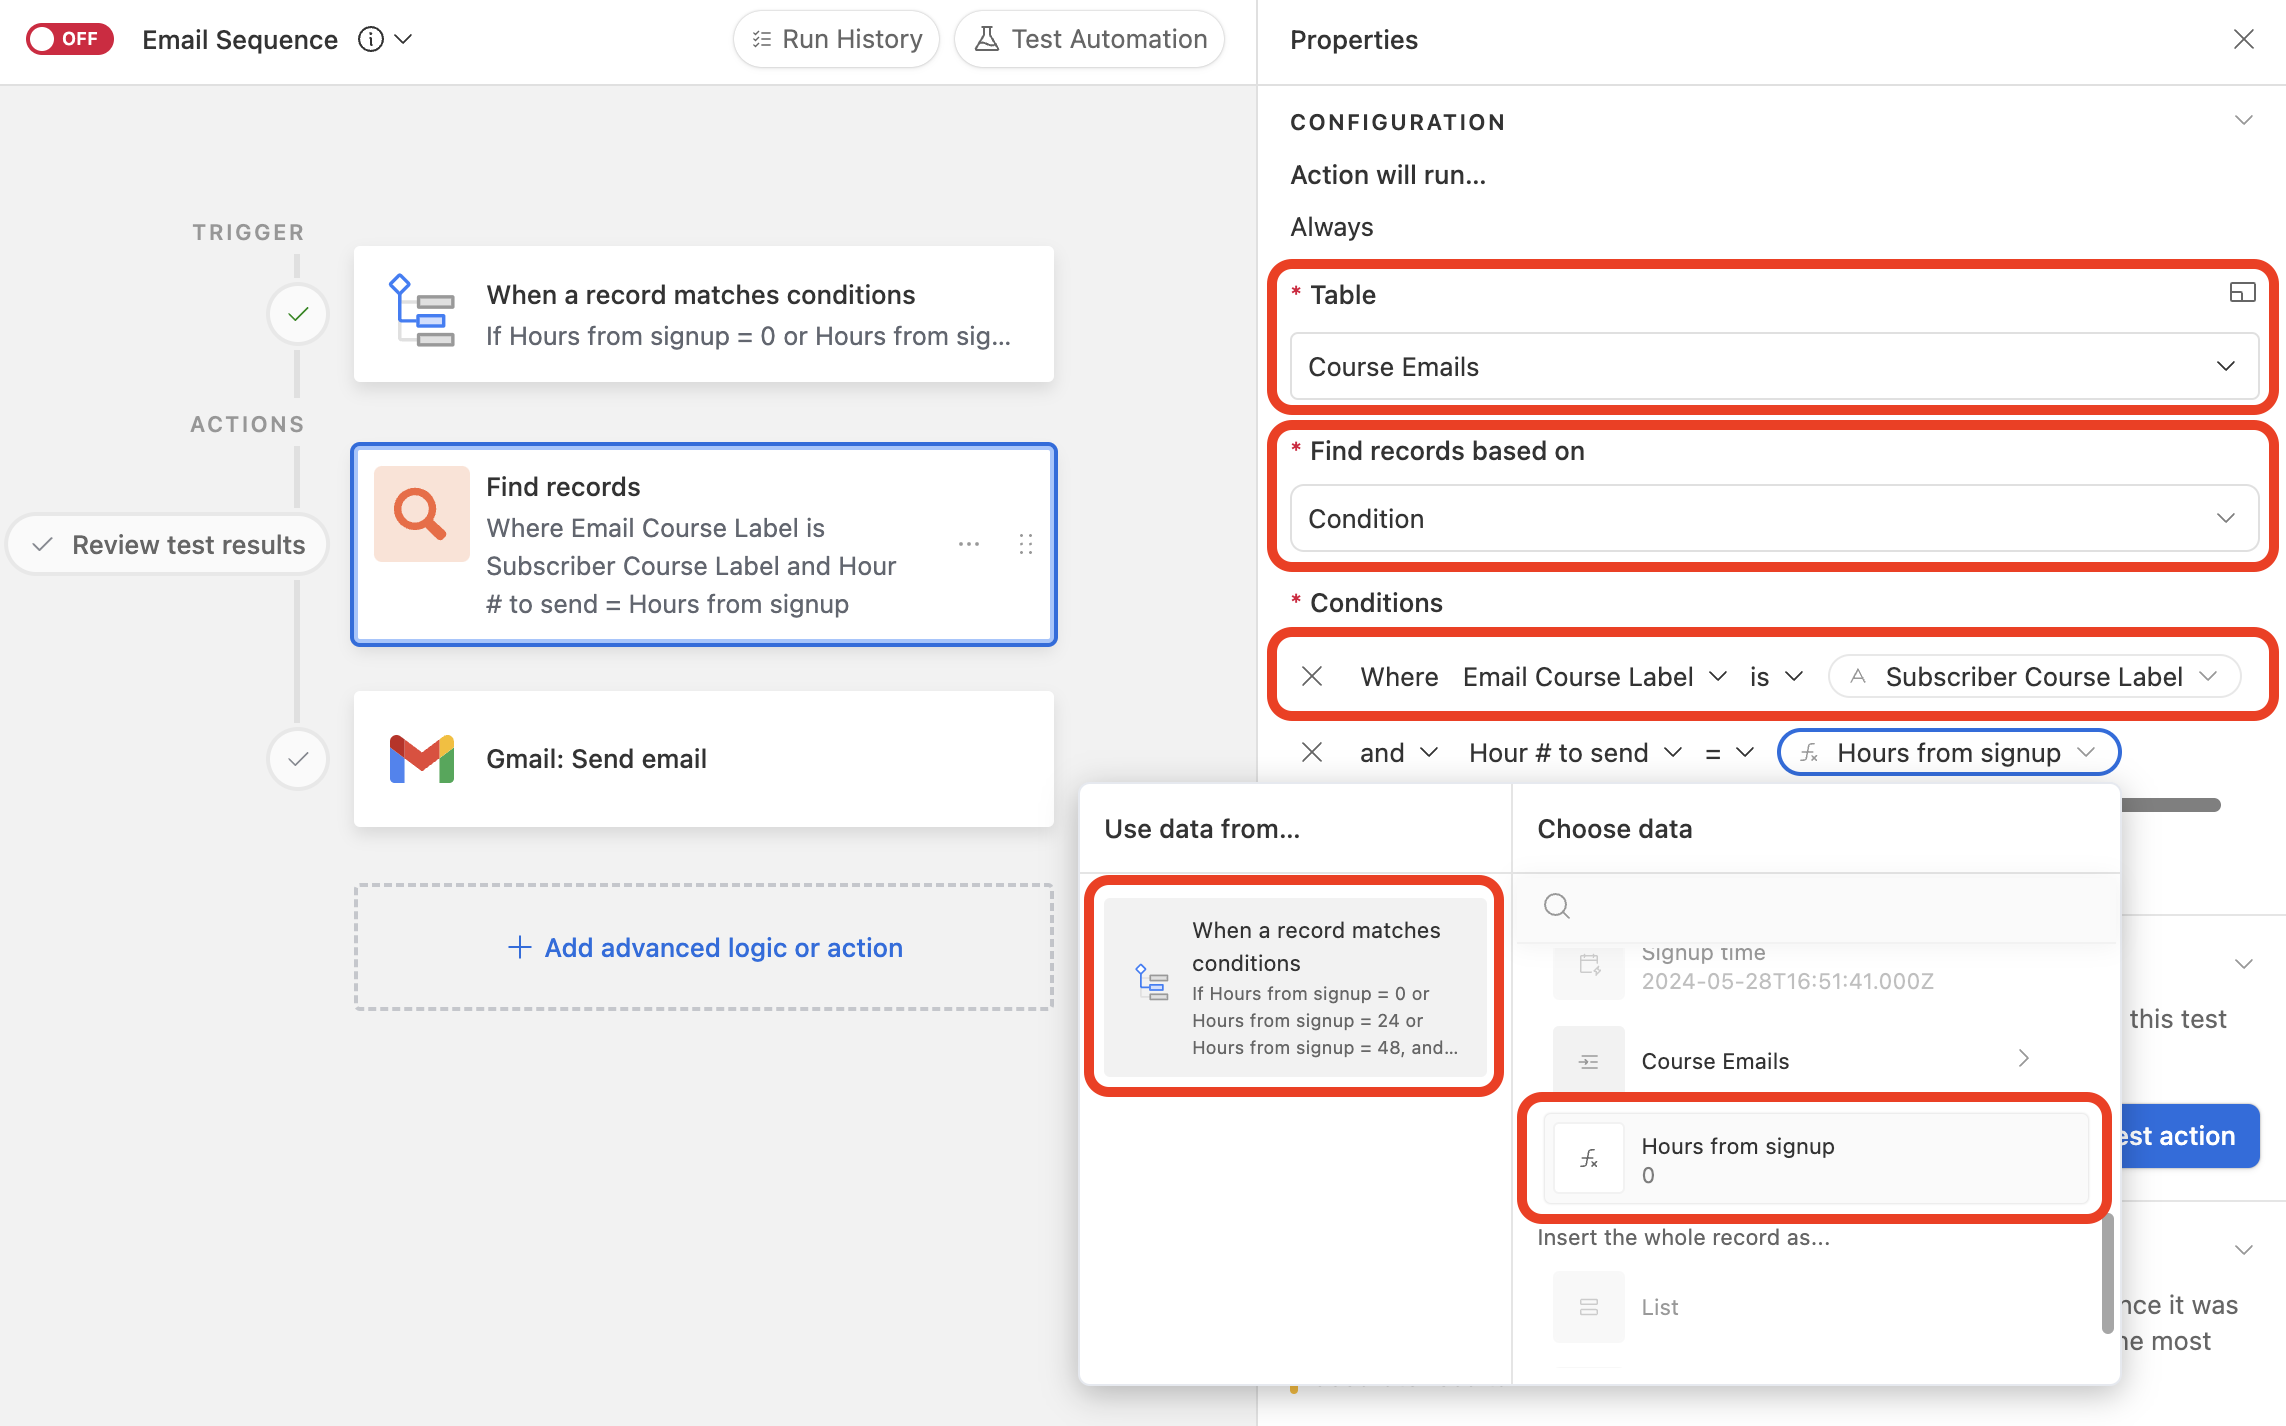
1st action: Match an email to send
- Action: Find records;
- Table: Couse Emails;
- Find records based on: Condition;
- Set up conditions with dynamically set values:
- Where Email Course Label is Subscriber Course Label;
- and Hour # to send = Hours from signup.
2nd action: Send a previously found Course Email to the subscriber
- Action: Gmail: Send email;
- Account: Connect new Gmail account, and follow the instructions
- To: email field value from the Trigger step;
- Subject: List of "Theme" from the Find records step;
- Message: List of "Content" from the Find records step.
- Attachment: List of Attachement from the Find records step.
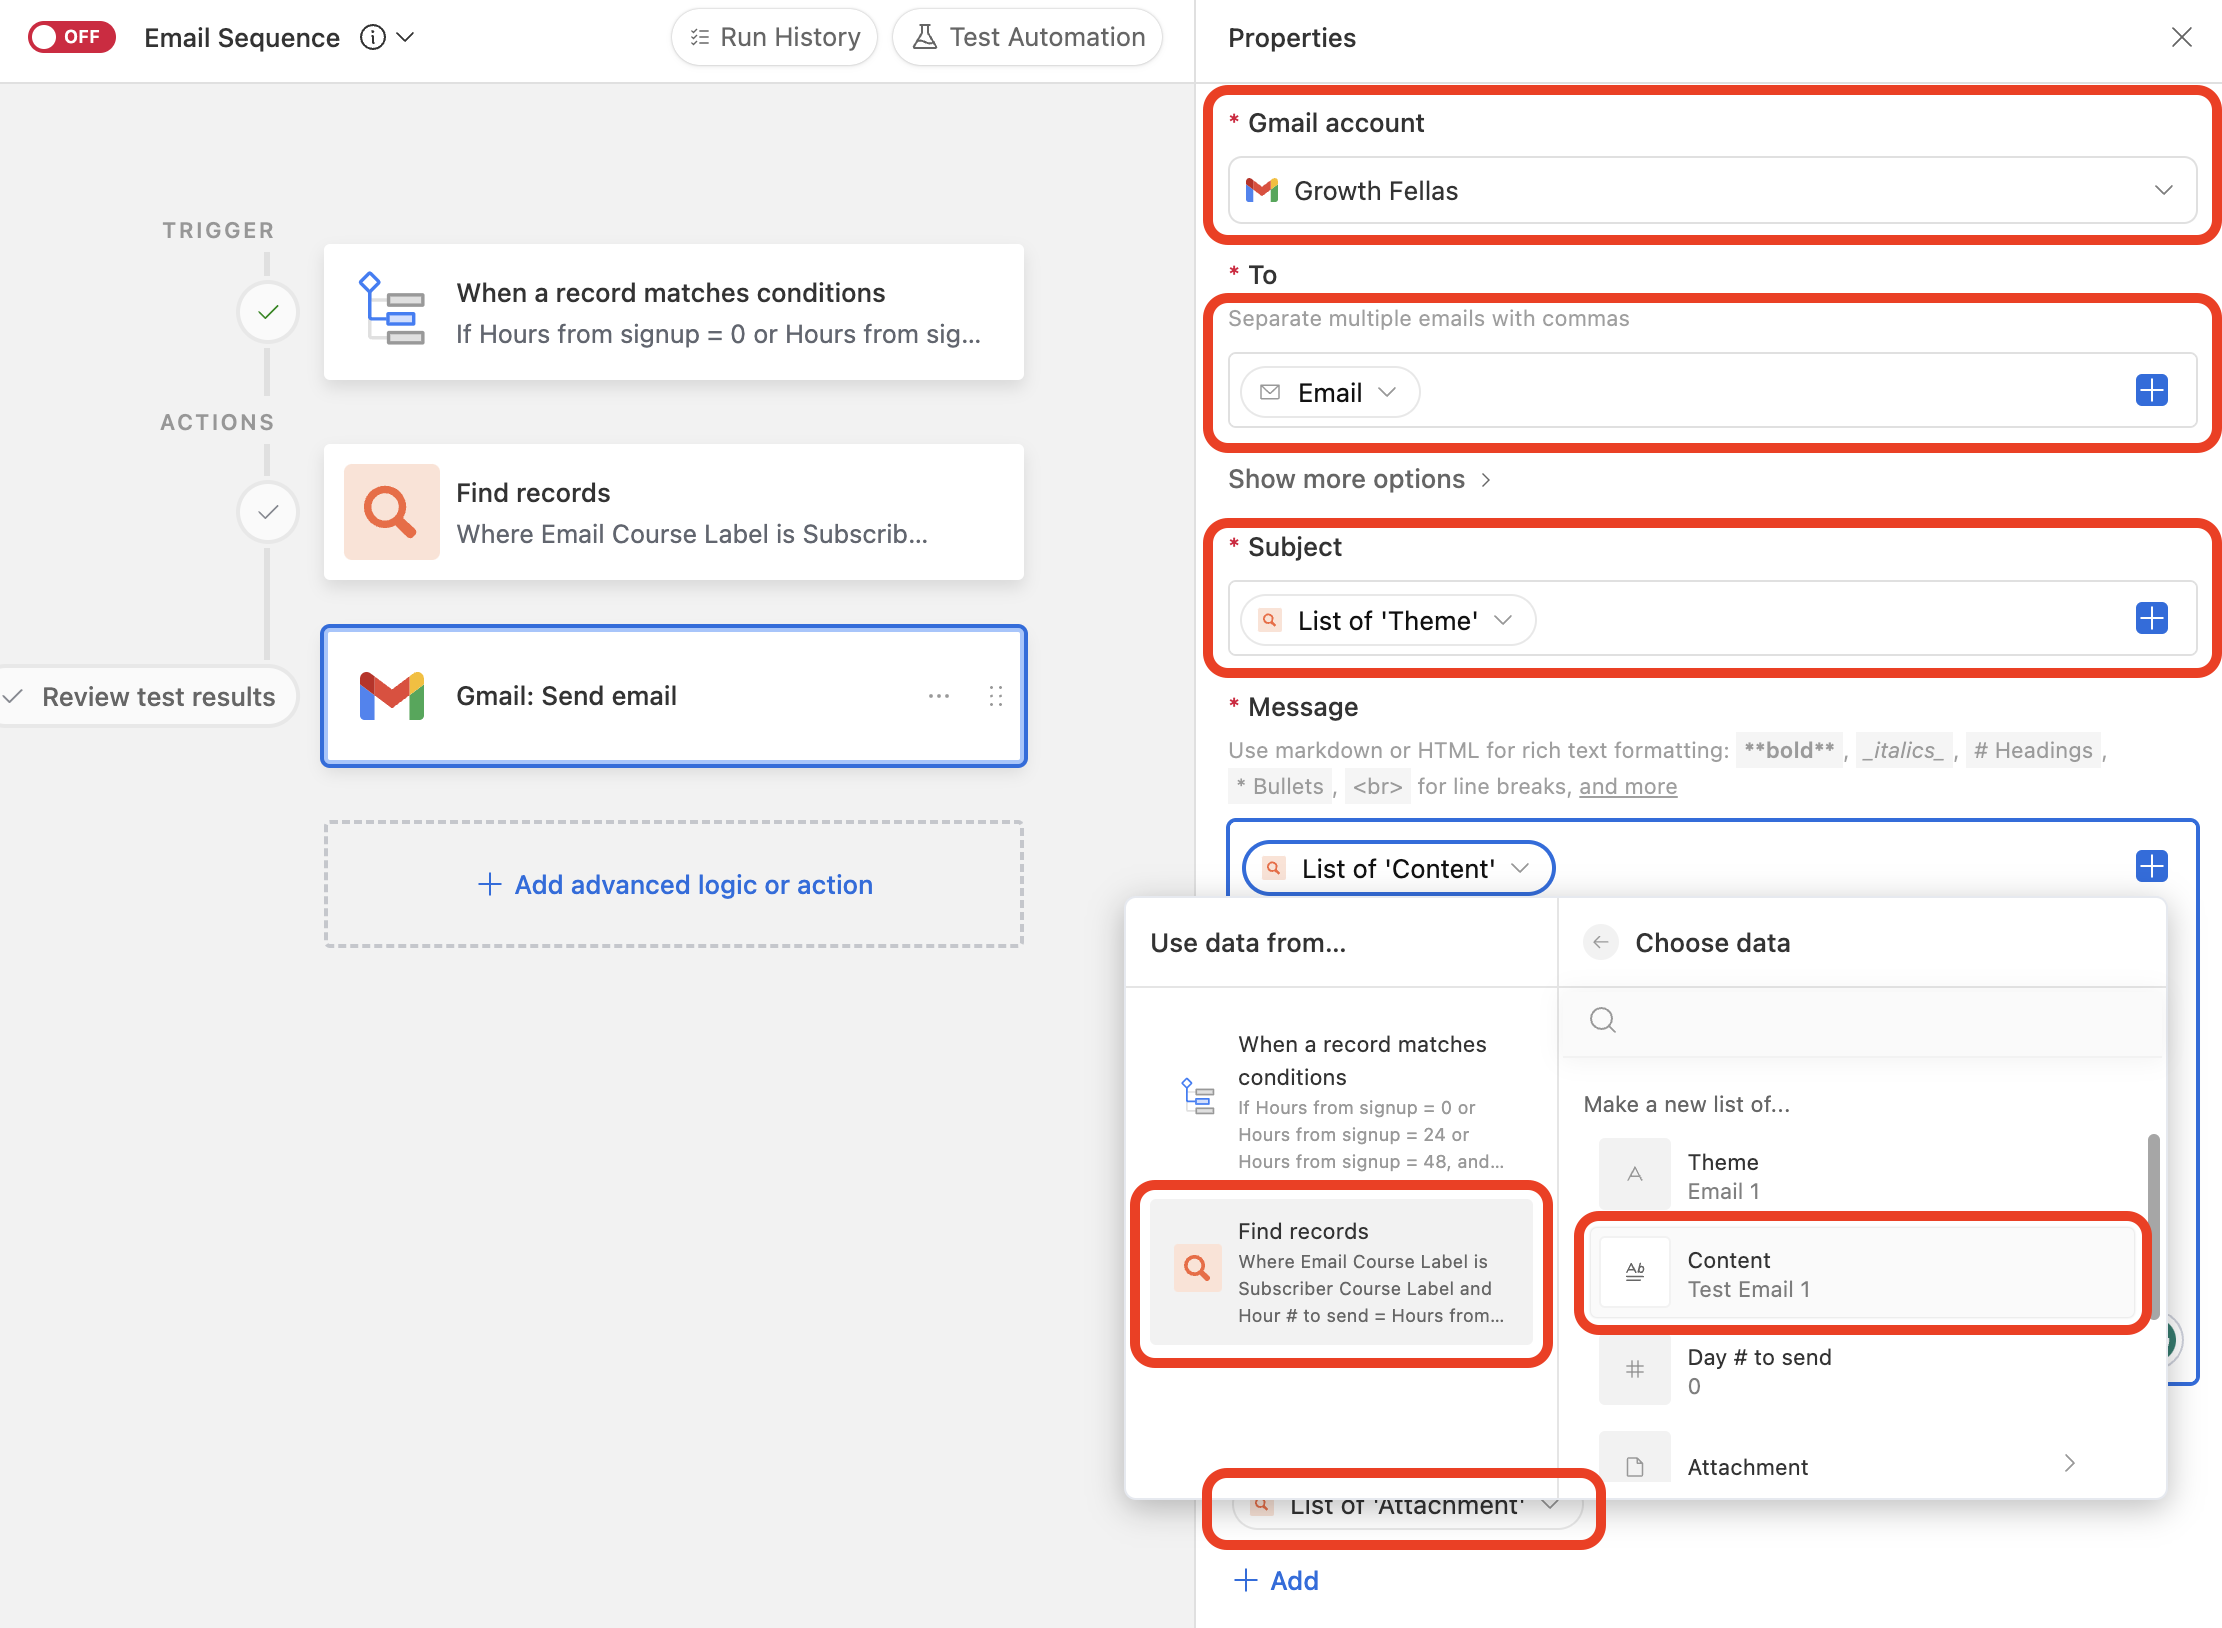
You can also set CC, BCC, From Name, From Address and Reply to by clicking "Show more options" under the "To" field.
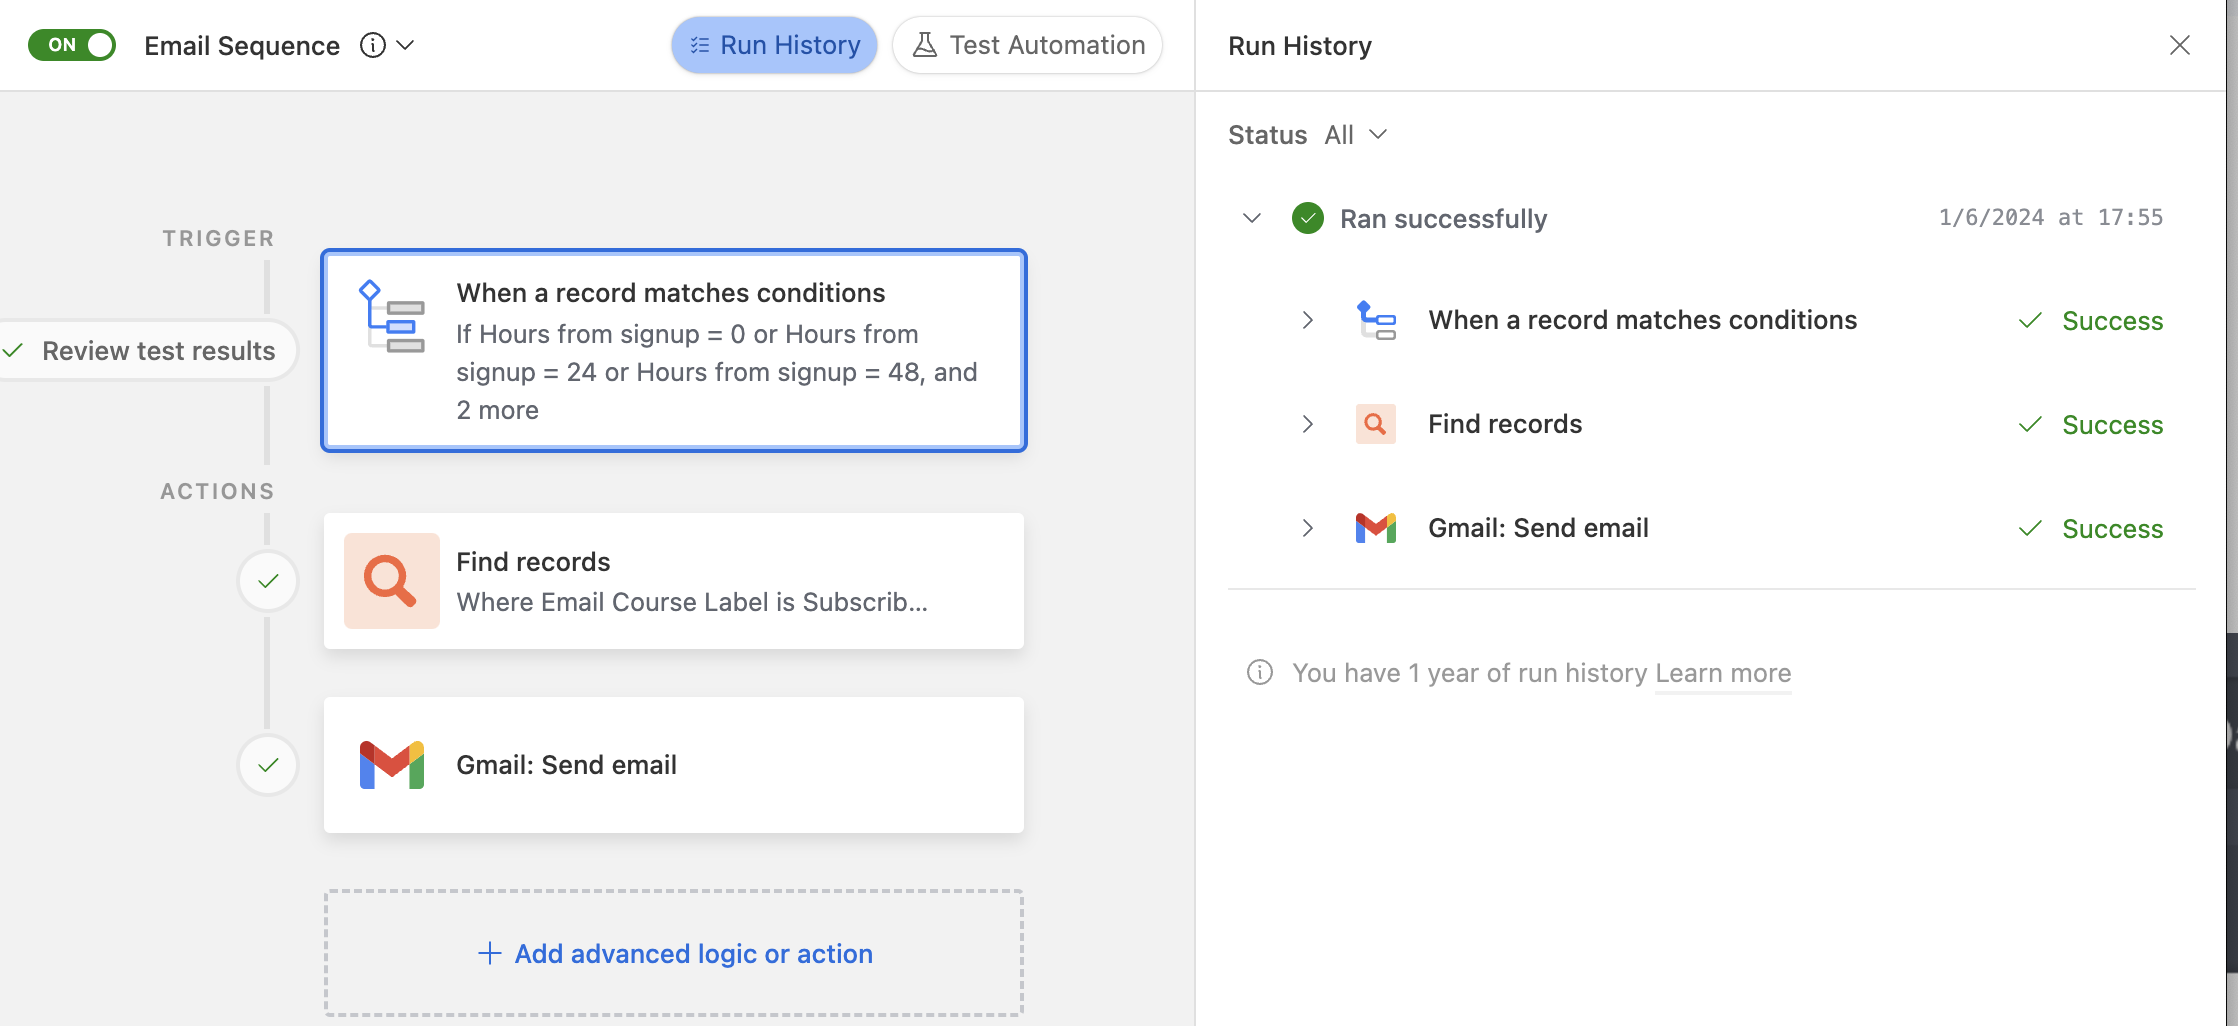
Test the automation
We recommend to test each step and action separately to make sure everything works correctly and easily found issues if it doesn't.
- Test trigger
- You need a "Subscribers" record with "0" in "Hours from signup" field to test the trigger.
- Simply create a record manually with a real email and promo-course value in the "Subscriber Course Label" field. It will have "0" in the "Hours from signup" by default.
- Select trigger and click "Choose a record" to test.
- Test "Find Records" action
It should find an email with promo-course as the "Email Course label" value and "0" in "Hour # to send".
- Test "Gmail: Send email action" and see if you received a correct email.
6. Test the workflow
- Turn on both Airtable automations.
- Submit the form on a Ghost page.
- Confirm signup from received email.
- Check if a Subscriber record was created with correct email and label.
- Check if the 1st Course Email received into your inbox and properly rendered.
- If not, review Automation Run history and correct data at every step.
- For the email content, use Long text Airtable field with basic formatting or HTML markup.
Done!
Let us know in the comments below how it works for you.


.svg)

Log In or Sign Up above to join the conversation.
Log In or Sign Up to join the conversation.
Join the discussion
0 comments